
Robot systems include a variety of equipment to keep operators/people safe around an active robot cell.
Some of these physical safety devices include:
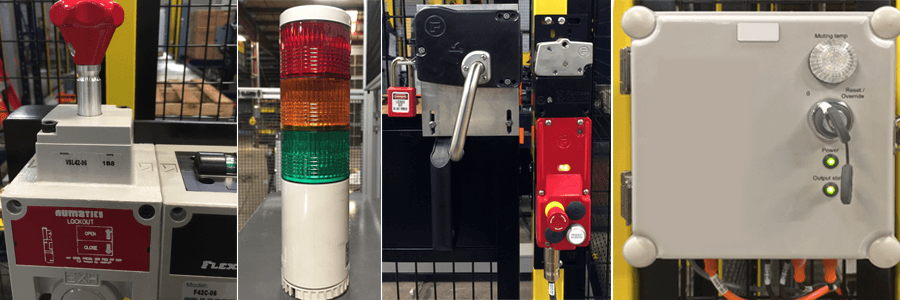
- EMERGENCY STOP buttons
- Safety fences, barriers, or chains
- Light curtains
- Interlocks
- Pressure mats
- Floor directional and safety markings
- Warning lights
- Mechanical stops
Dual Check Safety (DCS) is a software used to program safety features in the robot system using built-in sensors. DCS limits the robot workspace and speed to a defined workarea. Then DCS monitors these established parameters stopping robot motion if the robot moves beyond any parameter and triggering a DCS Alarm.
If the robot does reach outside the established safe zone the alarm can only be cleared using the teach pendant in T1 mode to move the robot back into the safe zone.
Watch Step by Step Robot How-to Video for Resetting a DCS Alarm
Types of Stops (following IEC 60204-1)
- Power-Off Stop– Servo power is cut, and the robot stops immediately. This occurs when a collision is detected – this type of stop should be analyzed to make sure it is preventable in the future because immediate stops are bad for the overall robot health.
- Controlled Stop – typical stop where speed is slowed as robot stops (yet robot stays inside the safe zone) then servo power is turned off.
- Smooth stop – This stop is like above, but robot is stopped quicker.
- Hold – The robot is slowed to a stop but the servos remain on and the robot can continue without clearing an alarm.
DCS is also used to keep the robot arm and tooling away from other mechanical items in the robot cell, like conveyors, product, other stations.
The DCS menu on the Teach pendant is where these parameters are set up, and anytime there are any changes to the cell the setup should also be adjusted.

- Joint Position Check – checks to make sure the robot joints are within the defined safety zone
- Joint Speed Check – checks to ensure the robot speed remains in the safe limit
- Cartesian Position Check – Establishes a safe zone and checks orientation (yaw, pitch, rotation – W,P,R)
- Cartesian Speed Check – checks TCP (Tool Center Point Control) speed
- T1 Mode Speed Check – Monitors the TCP or Face Plate speed shutting down the motor power if it ever exceeds 250 mm/sec
- User Model – helps build the shape model – defines robot and tool shape
- Tool Frame – Allows input of different size items that may be picked by the tool
- User Frame – Based on (x,y,z,w,p,r) coordinates
- Stop Position Prediction – Predicts the stopping position of the robot based on robot, payload, and speed
- Robot Setup – selection of which robot is in the robot cell
- Mastering Parameters
- /Speed Check Setup
- Safe I/O Consistency Check
- Safe I/O Device
- Signature Number
- Code Number Setup
Instructions to Reset a DCS Alarm
If the robot does reach outside the established safe zone the alarm can only be cleared using the teach pendant in T1 mode to move the robot back into the safe zone.
Dual Check Safety is a software used to define the robot’s workspace and speed. DCS monitors robot motion stopping the robot if it moves beyond any set parameter and triggering a system alarm.
- The robot needs to be in T1 for a DCS reset procedure and the Teach Pendant needs to be ON
- Select MENU and arrow down to ALARM – The alarm screen shows a SRVO-402. This is a DCS alarm saying that the Cartesian Position is out of limits.
- Now select MENU and arrow up to NEXT and press ENTER – This brings up MENU2 – arrow down to SYSTEM and ENTER
- The System Clock screen is visible. Now go down to the Menu bar and select | TYPE |and Arrow to DCS
- The DCS screen shows a list of DCS parameters and the Cartesian Position Check parameter is marked as Unsafe
- Right Scroll > the lower bar menu until you see 4D. A model of the robot pops up on the right side of the screen. You can see that the zone is red meaning the robot can not move.
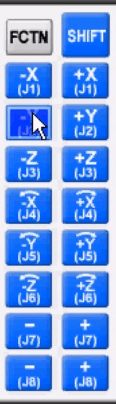
- Select SHIFT and RESET –Then select SHIFT again – In this example we are in WORLD jog mode and the robot has gone out of the zone in the + or – Y direction, so to get back into the zone we will jog using the + or – Y jog key. For your specific DCS error use the proper jog keys on the right of the teach pendant.
- The alarm that was present on the top of the teach pendant is gone and the robot is now in the green, safe zone and can continue working.