
HMI Cell Status Screen
One of the most important screens of your HMI layout is the Cell Status Screen, being the first page to check if any issues arise within the cell.
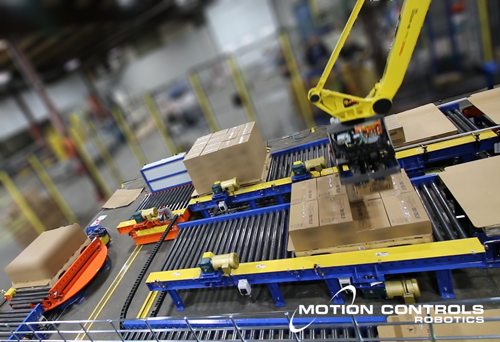
The cell status screen(s) on the HMI is a visual overview of the system. This screen will display sensors, cylinders, drives, or conveyor status actively throughout production.
How Many Status Screens are there?
Any major section of your cell that needs certain controls or indicators will likely have a separate Status Screen. If an operator needs to get the system out of a fault, this is their main resource. They have some form of control outside of the programs themselves via the HMI.
For example, if you have a large system with a variety of automation working together, then the HMI will contain a status screen for each piece of automation. An end of line palletizing cell with 4 pallet stations, a pallet dispenser, and a transfer car to move filled pallets out of the cell to a wrapper will have a screen for:
- The Main Cell
- Pallet Dispensers
- Wrappers
- Sheet placing gantry’s
- EOAT status
- Transfer carts / AGV’s
See example of this type of system >>>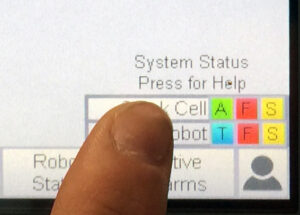
Each screen of the HMI has a legend at the bottom right – this is a quick visual for the total system status and a way to quickly see the system’s mode and faults. The example to the right shows how each Status Screen is listed and you can see there is an issue with the M410 Robot.
How to Read the HMI Cell Status Screen
Many times, I have been asked where an operator can check the status of a sensor or cylinder, this screen is the answer. Each red/green light or arrow is associated with sensors throughout the cell. ~ Caleb Ireland – MCRI Programmer
There are basically three status types that can be evaluated: Product Sensors, Cylinder Sensors, and Motor Status.
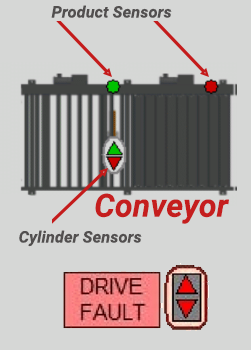
Product Sensors
Each product sensor on the conveyors is shown as a red or green dot on the HMI. A green dot or red dot can signify if product is present or not, pending the setup of the sensor. The red indicators do not necessarily mean there is a problem present. The image shows an example of the sensors.
Cylinder Sensors
Cylinder sensors are used to detect cylinder or lift position. These are shown as red and green triangles and are pointed in the direction of movement. A cylinder fault is shown as a red and yellow flashing circle around the cylinder or lift sensor that is not in the correct state for the action requested. Informational Pop-ups are shown by the fault to give more information. These pop-ups are typically red in color for easy identification.
Motor Status
Conveying and their status can change if their motion is active longer than anticipated by the PLC or physical constraints. You can have a “Move Fault” or a “Drive Fault” above the affected motor. A move fault can be cleared by pressing the fault after the move has completed and a drive fault will clear when the drive is in a good state.
Use Case for the HMI Cell Status Screen Info
The robot stops before picking my product. I would go to the HMI and on the Cell Status screen check if my product present sensors at my infeed, pallet/sheet show present on the outfeed conveying, or if my robot is waiting on an input. Robot status is always displayed. If the robot is waiting for inputs to be made, I would check at the robot status, decreasing the amount of guess work needed to get the robot running again. You can actively track product throughout a conveyor run, by following the sensor indicators to see if they need reset.
On the Home or Cell Status Screens of the HMI, near the top left in the Area Status Module you can reset any faults by pressing “Reset Fault / Reset Safety” or enable the cell if an E-Stop has been pressed with “Enable System”
Your System in Manual Mode
When the cell is running in auto, any manual control options are hidden. When the cell is no longer in auto and the cell is safe, an operator can manually control cell components.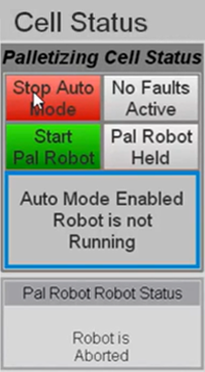
To get your cell to Manual and see the Manual options press the “Stop Auto Mode”. Pressing “Stop Auto Mode” will prevent the robot from getting the next task but will not stop the robot until it finishes that task.
If the robot is running, you have the following options:
- The “Hold Robot” button will safely stop the robot in its current state, pausing until started or aborted. If the robot is started after being held, it will continue where it left off. If the robot is aborted after being held, it will not continue where it left off in the program and will run the main program from the beginning.
- The “Abort Program” button will abort the current task and will start from the beginning of the main program the next time the robot is ran.
- The “Home Robot” will have the robot home itself and stop when there, waiting to be started.
You might put the cell in manual mode for maintenance or troubleshooting. When a system has an issue or requires maintenance, you may need to switch to manual mode to safely access and inspect the fault(s) or perform the necessary maintenance. Allowing you to diagnose and resolve any problems without the robot operating autonomously.
When the system is in manual mode, the buttons below show up on the status screen to help you solve faults. You can perform certain tasks like operation of the cylinders or lifts and jogging the robot by pressing the button on the HMI screen.
Conveyor Status Options – HMI Cell Status Screen
FWD and REV conveyor controls available, moving only when a button press is maintained or if available, enabled with other conveyors to jog at once. These are the different statuses for the conveyors:
- Displayed above or by each conveyor is the conveyor name followed by a box that either displays status information or a button that allows the conveyor to be jogged in “Manual” mode.
- If a conveyor has a fault (e.g., “Cycle Held” or “Move Fault”), it can be cleared by pressing the conveyor button itself if reset is allowed.
- The “Reset Faults” on the main message display will also reset conveyor faults.
- “Safety Disable” is not resettable until the safety for the area is reset.
- “Disc Off” indicates that the conveyor motor’s individual disconnect is off. (May only be present if disconnects are on each conveyor and being monitored.
“Safety Disable” is not resettable until the safety for the area is reset.
To go about problem solving this issues:
Start with the devices that have their own reset. These devices may have their own reset, bypass, or physical requirement before you can reset them at your HMI. Some example devices are the following:
- Light Curtain muting
- Pull cords
- Gate switches
- Key pods
If you have questions about the HMI Cell Status Screen, let us know. We are always looking for opportunities for improvements to make the user experience as easy as possible.